Decks require solid footings to withstand the elements. For most, this means digging and pouring concrete. Then, install posts and joists according to the plan.
When building a deck, solid framing is the foundation for a safe and durable structure. The frame distributes weight evenly to maintain stability and prevent shifting over time. In addition, a solid frame provides the flexibility to use different decking materials and explore unique design options. A well-built deck will provide years of enjoyment, and it will add to the value of your home. Contact Deck Builders Greensboro NC for professional help.
When constructing a deck, you can choose from wood, composite, or plastic decking boards. Wood decking is a traditional choice known for its beauty and warmth, while composite and plastic are low-maintenance options that are resistant to moisture and rot. Wood is the most common material for decking, and it is available in a variety of species and grades. The most commonly used woods include cedar and redwood.
To construct a deck, you will need to build the frame and support posts. The frame consists of the rim joists and end joists. The rim joists are made from two 2 x 10 boards, and the ends of the boards should be crowned. The crown is a slight arch in the board and should always be facing up. The end joists are also angled at an angle to provide added strength. The joists are fastened with deck screws.
After assembling the deck frame, you will need to install the 6×6 posts and footings. It is important to follow local codes and check soil conditions before setting the posts. Once the footings are in place, you can begin installing the post brackets and concrete. Before setting the posts, mark the locations for the frame with a string line and a level. Then, set the posts and anchor them with bolts.
Beams
Beams provide the support for your deck’s structure, carrying the weight of all other components. They also form the frame around which joists are installed. For this reason, it’s important to build them strong and level, using ACQ treated lumber that resists rot. In this video, the crew demonstrates how to build and fasten a beam, setting it in place, and checking for levelness. They also show how to set and install metal hardware, and how to build and position a flush beam.
The choice of a beam depends on the load it’s intended to carry and the span it covers. Engineers must match these requirements with the properties of potential beam materials—such as steel, concrete, or timber—taking into consideration strength, flexibility, and durability. Recent innovations in composite materials and pre-stressed concrete have paved the way for more efficient and environmentally friendly structural design.
Loads on a beam induce internal compressive and tensile stresses—the former due to gravity, the latter due to shear. When subjected to these loads, a simple beam will bend into a slightly circular arc, with its original length compressed at the top and stretched at the bottom to enclose an arc of larger radius. This configuration is called sagging, while one where the axis remains straight is known as hogging.
To increase the rigidity of a deck beam, build it flush with the deck joists. To do this, cut pointed spacers from a sheet of pressure-treated plywood (these points prevent rainwater from sitting on the wood and soaking in), and then fasten these to two separate beam lengths. Stack the two beam pieces together, sandwiching the spacers between them, and then bind them with screws or nails at 16-inch intervals. This creates a flush, solid beam that’s significantly stronger than a single 2×10 piece.
Joists
When a deck rises more than 6 feet above the ground, it requires support from beams called joists. These are typically 2 x 6s or 2 x 10s, but the exact size will depend on the span of the deck and local codes. The joists will rest on the foundation wall at one end and on a center “bearing” wall for longer spans. Joists can be made from wood, but usually they are pressure treated to resist rot and termites. They are also available prefabricated, but the prebuilt joists can be expensive and difficult to transport unless you have a large flatbed trailer.
The first step in joist construction is to lay out the layout. The easiest way to do this is to snap a chalkline across the deck where you’ll build the frame and then, using a tape measure, mark the location of the rim joists. It’s important to get the joists as close together as possible and not to let the sheathing extend past them, which can cause structural problems down the line.
A good time-saving tool to use at this stage is a cordless jigsaw. This will allow you to cut quickly and accurately around posts, reducing your assembly time by about 50%.
A couple of notes on joist construction: 1) Always cover the tops of joists when building a deck, to keep out insects and critters. It’s even better to screw down a piece of diamond lath on the back side, which will keep out both mice and raccoons (although baby raccoons are the cutest ever). 2) Make sure that all joists are nailed into the sheathing, so you don’t have standing water between the boards.
Posts
Posts provide support for deck beams and provide stability to the entire structure. The size and spacing of posts depends on the size of the deck, but most builders install them every 8 feet. Ideally, the posts should be located at least 4 feet from each property line to avoid any structural damage from neighbors’ fences or landscaping. Posts are usually pressure-treated wood, but some decks use metal supports for added strength and stability.
A post should never rest on concrete, as this could contribute to a deck collapse. This is why you should use metal connection post bases to connect the wood posts to the concrete piers. These devices come in several different types, but all are sized to match the wood posts. You can find them at most home centers and online.
You should also use a level to establish the height of each deck post. A water level works best because it helps you determine whether the posts are even with each other and with the bottom of the ledger (or whatever edge your plan prescribes). If you have a post anchor that’s fabricated to accept a lag screw, predrill for it before driving the fastener.
Using a spade shovel or clamshell post hole digger, dig the holes where you intend to set the posts. Be sure to excavate below the frost line, which varies by region.
Once you have the posts installed, you can finish them with a post cap or finial. These accessories protect the tops of the posts from rain, and they’re available in a variety of styles. Some are fluted, corniced or chamfered to add a touch of elegance.
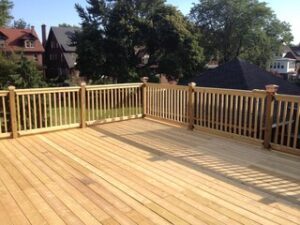
Railings
A railing is an important part of your deck that keeps you and guests safe from falls. It also adds beauty and style to your outdoor space. You can choose from a variety of materials for your deck railing, including wood and metal. Choose one that matches the architectural style of your home for a cohesive look. Regardless of the material you choose, be sure to follow the installation requirements and safety guidelines for your chosen railing.
When building a deck, make sure you check with local planning and building departments to ensure you have all the proper permits. These departments will give you guidelines and help you determine the size and shape of your deck. They can also advise you if your project will require footings or foundations.
Once you have all your permits, it’s time to start construction. Begin by installing the posts and beams. Make sure the posts are firmly embedded in the footings and the beams are perpendicular to them. Then, install the joists. Make sure the joists are properly spaced and use metal joist hangers to secure them to the posts. Once the joists are in place, you can lay down the decking.
When installing decking, cut the boards to fit between the joists and leave a small gap at the ends of each board. Then, screw the decking to the joists using long screws. When you are finished, your deck should look like this. To add a finishing touch, you can decorate the top of your deck with planters, benches and other decorative items. You can even add built-in lighting to your deck for a more dramatic effect at night.